
-
Welcome to the ElgrandOC forum. You will find that the majority of the forum is locked, but do not worry. You can unlock more content by registering to the forum completely free. Sign up is automatic, does not require email confirmation and is instant. Feel free to browse through the sections to see what topics have been covered before you register. You can register for an account by CLICKING HERE Once you have registered, you will unlock more of the forum content. You will not unlock all of the content until you have reached 10 posts. This is to give you an opportunity to chat to existing members and help to integrate you into the forum community. We are a friendly and helpful community and there is a wealth of infomation contained within the forum. Please feel free to register, introduce yourself and get to know your fellow members. Feel free to look at the Frequently Asked Questions section, the Meets/Events section and the Competition Section without having to register. We look forward to getting to know you and help you with any questions or problemd you have with your Elgrand.
You are using an out of date browser. It may not display this or other websites correctly.
You should upgrade or use an alternative browser.
You should upgrade or use an alternative browser.
Daylight Running Lights - interested to see what you’ve installed
- Thread starter neebster
- Start date

I unbolted the wing a bit to give myself room to slide the led into place. The LEDs were in a rectangular plastic sleeve that you have to stick onto the top of the light. The light has a rubber gasket that protects the edge of the wing... I gently eased that off and tucked it inside the end of the wing before sticking down the led strip.I've been tinkering with installing similar on mine and found that the bonnet sits below the side of the light how'd you get yours so straight? mine have a kind of kink in them at the edge of the bonnet also i think yours must be a bit more expensive as they look less like a line of leds and more like a smooth strip as they light up. Any tips and tricks you can share @Winchester ?
- Messages
- 107
- Reaction score
- 106
- Points
- 163
- Location
- Newcastle
- First Name
- Glen
- Elgrand
- E51
- Region
- North East

2x Sequential LED Strip Turn Signal Switchback Indicator Daytime Running Lights | eBay
2x 30/45/60cm Super Slim Strip Tape Lights (length depends on your choice). White and amber flexible soft LED Strip Light for car. When switched to yellow colour, it can be used as turn signal light (Flowing Water Model Light).
www.ebay.co.uk
These are the ones I got, and they slid in under the wing. but beneath the wing the headlight steps up an then down where the bonnet is and its tricky to get it looking decent. I may have to get some different ones or mess about with the fitting a bit more. Looks okayish but not nearly the effect I was looking for.
2x Sequential LED Strip Turn Signal Switchback Indicator Daytime Running Lights | eBay
2x 30/45/60cm Super Slim Strip Tape Lights (length depends on your choice). White and amber flexible soft LED Strip Light for car. When switched to yellow colour, it can be used as turn signal light (Flowing Water Model Light).www.ebay.co.uk
These are the ones I got, and they slid in under the wing. but beneath the wing the headlight steps up an then down where the bonnet is and its tricky to get it looking decent. I may have to get some different ones or mess about with the fitting a bit more. Looks okayish but not nearly the effect I was looking for.
They look similar to the ones I had... mine were 4mm thick from memory and sat nice and flat in front of that step in the light top surface.
- Messages
- 107
- Reaction score
- 106
- Points
- 163
- Location
- Newcastle
- First Name
- Glen
- Elgrand
- E51
- Region
- North East
looking at @peter strokosz they look much thicker than the cut off self adhesive ones I've got, think I'll order some different ones and see how they perform.

- Messages
- 11
- Reaction score
- 6
- Points
- 13
- Location
- australia
- First Name
- vu
- Elgrand
- E51
- Region
- Rest Of World
Remember there is a bright side to these .. so after wiring check as you may have to flip them over ..hope these photos help View attachment 29325View attachment 29326View attachment 29327View attachment 29325View attachment 29326View attachment 29327
Wow this looks super cool. Just wondering if you had to remove the headlight unit. I'm looking to get these drl strips to install on my Elgrand also.Mine

- Messages
- 9,323
- Reaction score
- 41,290
- Points
- 473
- Location
- Co. Durham
- First Name
- Andy
- Elgrand
- Ex Owner
- Region
- North East
No they just push underWow this looks super cool. Just wondering if you had to remove the headlight unit. I'm looking to get these drl strips to install on my Elgrand also.

- Messages
- 602
- Reaction score
- 1,272
- Points
- 313
- Location
- Derby
- First Name
- Ian
- Elgrand
- E51
- Region
- Midlands
These are mine:

Quite a challenge separating the lights to put them in! They are a lot brighter than they look in the picture. They have the flowing indicators too:
I repurposed the old indicators as sidelights instead.
Quite a challenge separating the lights to put them in! They are a lot brighter than they look in the picture. They have the flowing indicators too:
I repurposed the old indicators as sidelights instead.
Hi guys, quick question. I changed my sidelights to LED bulbs today and when I installed them for one side I saw a spark appear. I quickly took them out and replaced with normal halogens. Now both of my side lights not working. Any ideas?
D
diable
Guest
Check fuses.
Would you know where the fuse is for the side lights? Thanks.Check fuses.
D
diable
Guest
Can't remember under the bonnet or behind the coin holder.
Last edited by a moderator:

I like the factory look of these. Good job. How did you feed in the led? Did you have to open up the headlight assembly? If so how easy was it and have you managed to get a decent seal afterwards? CheersThese are mine:
Quite a challenge separating the lights to put them in! They are a lot brighter than they look in the picture. They have the flowing indicators too:
I repurposed the old indicators as sidelights instead.
- Messages
- 602
- Reaction score
- 1,272
- Points
- 313
- Location
- Derby
- First Name
- Ian
- Elgrand
- E51
- Region
- Midlands
It was not particularly easy. You do have to open up the lights, and I did it in conjunction with painting the insides of the lights black. I also painted the sidelight prism black, stuck the LED strip to it and drilled a small hole in the end to feed the wires through. The sidelight bulb was removed, and the LED wires exited the head lamp assembly where it used to be. The now redundant indicators were repurposed as sidelights, which also was not as straightforward as I was hoping for...
Haha. Thank you very much for the info. Nothing is ever as straightforward as we hope it will be! You've inspired me to give it a go though! I've seen some clips of people opening the assembly (on other models) by sticking them in a low oven for 7 mins ! What's the worst that could happen 
D
diable
Guest
Your wife will kill you and whilst you are at it use the parts washer as well aka the dishwasher....Haha. Thank you very much for the info. Nothing is ever as straightforward as we hope it will be! You've inspired me to give it a go though! I've seen some clips of people opening the assembly (on other models) by sticking them in a low oven for 7 mins ! What's the worst that could happen

- Messages
- 373
- Reaction score
- 894
- Points
- 213
- Location
- Huddersfield
- First Name
- Adrian
- Elgrand
- E51
- Region
- Yorkshire
Wanting to do this and also use the fuse pump relay fuse with a piggy back fuse as @Winchester has, does anyone have tge fuse diagram to show which one this is please
- Messages
- 9,323
- Reaction score
- 41,290
- Points
- 473
- Location
- Co. Durham
- First Name
- Andy
- Elgrand
- Ex Owner
- Region
- North East
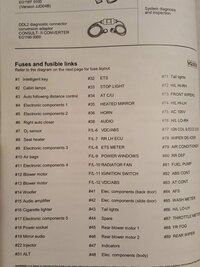
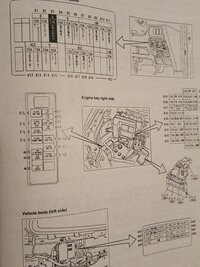
- Messages
- 9,323
- Reaction score
- 41,290
- Points
- 473
- Location
- Co. Durham
- First Name
- Andy
- Elgrand
- Ex Owner
- Region
- North East
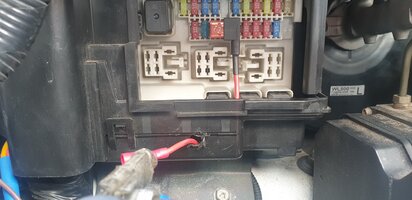
Mine are connected to here.
Just added some new lower ones today.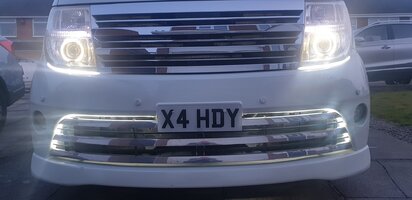
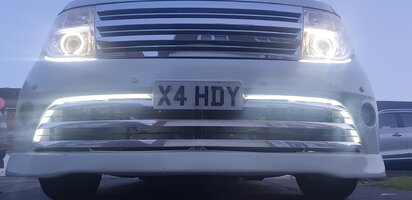
Just added some new lower ones today.