• Welcome to the ElgrandOC forum.

    You will find that the majority of the forum is locked, but do not worry. You can unlock more content by registering to the forum completely free. Sign up is automatic, does not require email confirmation and is instant. Feel free to browse through the sections to see what topics have been covered before you register.
    You can register for an account by CLICKING HERE

    Once you have registered, you will unlock more of the forum content. You will not unlock all of the content until you have reached 10 posts. This is to give you an opportunity to chat to existing members and help to integrate you into the forum community.
    We are a friendly and helpful community and there is a wealth of infomation contained within the forum. Please feel free to register, introduce yourself and get to know your fellow members.

    Feel free to look at the Frequently Asked Questions section, the Meets/Events section and the Competition Section without having to register.
    We look forward to getting to know you and help you with any questions or problemd you have with your Elgrand.

Boat pics

Decided to buy a full set of new cylinder head bolts for it, plus I needed a set of dowels to locate the cylinder head gasket before I could refit the heads. Seems the only place in the UK I could get either/both from was Rock Auto but I still couldn't get just the dowels, had to buy a 'kit' that included dowels, carb fuel pump eccentric, cam thrust plate and cam thrust plate retaining bolts. Wish I'd known earlier because I bought a set of cam retainer bolts from the US just before the start of my holiday which arrived just after my return from holiday which cost me £12 for 2 little bolts!

Had the cylinder heads skimmed at a local machine shop to get rid of a bit of pitting I was concerned about around the fire ring area.

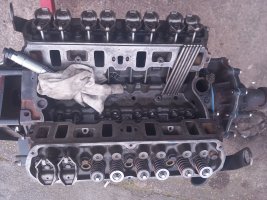
I decided to remove the valves to check valve stem clearances (using the obvious and simple method of trying to rock them sideways in the cylinder head stem guides) and thought that while I'd got the valve springs off I might as well check the valve / seat mating faces and re-lap them. Today I had a bit of time to this but I only got as far as doing 6 valves on the port side head (cylinders 5 to 8) that didn't have any low compression issues anyway.... Yet still (even though there didn't seem to be any compression issues on the bank of cylinders that the head I worked on today came off) I had (and still have) a slight concern about one of the exhaust valves not seeming to lap in very well, the other 5 valves and seats I've worked on today have a great bright finish but this one exhaust valve (so far) has a few spots that remain looking a bit like pit marks (even though I can't feel anything) after a great deal of lapping. As said there were no issues with compression with this head but still I'd feel better if I got that valve mating face nice and bright.


View attachment 93920
i take it they pass the fuel overnight test ha ha
 
i take it they pass the fuel overnight test ha ha
I haven't done a liquid leak test on any of the valves yet, it's a test I might yet do maybe using paraffin etc but this head didn't have compression issues in the first place, it's just the one exhaust valve I have concerns about.

Today I got a bit of time to re-lap the remaining 2 valves that I didn't do the other day, no problem with them so seems no problem on 7 of the 8 valves on this head. But I removed the exhaust valve I have concerns about, tried to get as much carbon from the back of it and it's seat in the head as I could then had another go at lapping it. Noticed that instead of a nice straight 45 degree edge on the mating face it's rounded (concave valve) and there seems to be a bit of a protruding ring on the rear of the valve just above the mating face that's valve material not carbon. Slightly different sound when lapping this valve compared to the others. The thing is I think it will seal, at least when cold (that's what you can get with concave shape valve mating surface), it's on a cylinder that was good on compression during cold compression tests, but I don't know whether if I leave it how it is if it will soon start to cause a problem when running and end up burning or worse (dropping). I'll probably get a 2nd opinion from the pro engine builder or machine shop, if they agree it's a pending problem I'll have to fit a new valve and maybe seat, I might get that done anyway even if they say it's OK. As it stands now I don't think it'll cause an immediate issue but I think it'll be the first problem in time if I don't do anything about it.

That's the thing about rebuilding engines, if meticulous you can find potential issues you never knew were there and spend money and time on sorting them. I could've bought some brand new aftermarket / tuning aluminium heads complete with valves etc for maybe £700 that would have increased power by maybe 100bhp and not had to worry about this kind of thing with them, could soon run up a machine shop bill to a high fraction of that cost having work done on my old heads. If not meticulous I could just have thought this head didn't have any compression problems, just clean it up and stick it back on and it would have worked fine but I'd be none the wiser about this exhaust valve.
 
Last edited:
Slow progress with the boat lately.

After checking all the valves and seats again I decided to put new valves in and have the valve seats machined to match the new valves. Today I visited a local machine shop 'Lockside Engineering' with the heads for a 2nd opinion on them and they agreed it'll be best to put new valves in and have them machine the seats to get back to a nice straight landing area for the valves and suit the equally straight landing areas on the new valves. I left the heads with them and I've just ordered a set of valves from Rock Auto in the US. The engine valves cost around £2.50 each and Rock Auto's website says I will receive them on Monday 04th December! How's that for service? :) I was surprised at the low cost of the valves, thought they were just over £10 each, not moaning but I hope there hasn't been some sort of glitch meaning they'll get back to me and tell me I need to pay more because their system got the price wrong. As soon as I can after the valves arrive I'll take them to the machine shop so they can start the work on the heads. They'll be lapping the new valves to the new seats but I'll probably still do my own fluid leakdown test on them when I get the heads back to make sure they're sealing properly and remove the valves (again) to see how wide a band of lapped area they got on the mating areas.

I think while I've still got the sump off the bottom end, and with the slow progress etc, I might as well properly check all the big and main bearing clearances with Plastigauge, so I'll be getting some Plastigauge. The big and main bearings all looked good and the crank looked good... But I'd kick myself if I didn't check clearances if I put it all back together and there was still a knock from the engine.

Sounds like great progress Simon and YES please check the bottom end and not make the same mistake as me! :rolleyes:
 
Sounds like great progress Simon and YES please check the bottom end and not make the same mistake as me! :rolleyes:
I've already had it all stripped, honed the cylinder bores, put new pistons in it etc... So I've already inspected the bearings and they seemed just to have normal wear patterns, it doesn't seem likely there'll be a problem... But yeah I should still make sure the clearances are all good.
 
I've already had it all stripped, honed the cylinder bores, put new pistons in it etc... So I've already inspected the bearings and they seemed just to have normal wear patterns, it doesn't seem likely there'll be a problem... But yeah I should still make sure the clearances are all good.
Teaching granny I know but since you’re doing everything else don’t forget to check the crank end float—— does it have thrust washers ??
Might as well start with a nice tight feeling engine ( well not tight but you know what I mean)
 
Teaching granny I know but since you’re doing everything else don’t forget to check the crank end float—— does it have thrust washers ??
Might as well start with a nice tight feeling engine ( well not tight but you know what I mean)

Thanks Dave. I did check end float and found it to be fine. The 302 has the thrust bearing on the centre main bearing, I checked endfloat using a magnetic dial gauge.
 
I forgot to update this...

I queried the valve stem clearances with the machine shop and ended up having them fit new bronze valve guides fitted on all the exhaust valves on both heads.

When I picked the heads up (last week) I took them home and stripped them to make sure the machine shop had done the work I asked and done it properly. The heads are now 'nice'! Zero determinable play between any of the valves and guides, all the valve seats recut nicely and the valves nicely lapped in.

Plastigauge has arrived.

So when I get a bit of time I'll be checking the crank and rod bearing clearances and all being well will soon after be putting the heads back on the engine and fitting the new brass core/freeze plugs, then the inlet manifold, then the engine will be ready for dropping back into the boat.

There are some other bits I want to look into ideally while the engine is still out, such as exhaust 'flappers', the trim hydraulics, the bilge pump and instrumentation.
Less important, a previous owner fitted a 12" speaker into the area forward of the driver's seat, the speaker has a cabinet built behind it impeding on the cabin space, I fancy removing the speaker and putting the cabin back to standard.
 
Last edited:
Since my last post I've fitted a replacement bilge pump and changed internal hydraulic pipe to pump O rings (for the hydraulic system that lifts and lowers the 'leg' / outdrive). Still to test the hydrolics, probably the best way to test it now is just to refit the leg and bleed the system, see if the leg drops lower if I leave it at various angles of raised... If it does drop and there are no leaks on lines it'll be because there's either an internal leak in the pump or in ram(s), can buy rebuild kits for both.

Got a bit of time today so I did a bit more on the boat engine.

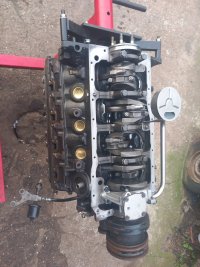
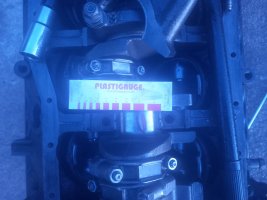
Plastigauged all the rod (big end) and main bearings except for the rear main which I'll have to do next time I get chance to work on it.

Very pleased with the Plastigauge readings, all bang in the middle of tolerance! All rods 0.0015" and all mains 0.0015">0.002" :)

Only took one pic, this is during checking #4 main bearing

20240305_180252.jpg
 
Last edited:
Since my last post I've fitted a replacement bilge pump and changed internal hydraulic pipe to pump O rings (for the hydraulic system that lifts and lowers the 'leg' / outdrive). Still to test the hydrolics, probably the best way to test it now is just to refit the leg and bleed the system, see if the leg drops lower if I leave it at various angles of raised... If it does drop and there are no leaks on lines it'll be because there's either an internal leak in the pump or in ram(s), can buy rebuild kits for both.

Got a bit of time today so I did a bit more on the boat engine.

Plastigauged all the rod (big end) and main bearings except for the rear main which I'll have to do next time I get chance to work on it.

Very pleased with the Plastigauge readings, all bang in the middle of tolerance! All rods 0.0015" and all mains 0.0015">0.002" :)

Only took one pic, this is during checking #4 main bearing

View attachment 98976

Looking great buddy! When its all done you can boat over to The Netherlands! lol
 
Nice to be able to have the confidence that the bearings are all OK.
Yes, I feel better for having checked the bearings for sure George. Wish I'd checked them ages ago as I intended because the possibility that there might have been a problem with the has been at the back of mind in all that time.

I didn't get chance to Plastigauge the final bearing (rear main) today but I hope to get time tomorrow or Friday. Then I can start to get put the tappets, pushrods,, cylinder heads and inlet manifold back on and it'll start to look more V8 engine shaped again.

The boat has a near full fuel tank containing near 35 gallons of E5 petrol most of which I put in around June or July last year. I recently posted on the pump thread about pumping gas from red bottles into my Elgrand tank and today pumping gas from one red bottle into another, but I also intend on using a pump to pump petrol from my boat petrol tank into my Elgrand petol tank and the missus' Corsa tank, then I can refuel the boat tank with fresh E5 petrol. I'm sure the petrol in the relatively full boat tank would be OK for the fairly low compresson and low state of tune old American Ford V8 engine but I don't want fuel problems to be even a potential factor of any problems I might encounter with the newly rebuilt boat engine so I want the boat to have fresh fuel and I'm effectilvely as well off if I burn the boat old fuel in the missus Corsa or over the nest year or so during the short warmup period when the Elgrand runs on petrol.
 
The rear main bearing also checked out fine with Plastigauge.

I fitted the new brass (marine spec) core plugs.

I was a bit concerned the hydraulic lifters were fully pumped up and might not bleed down so I stripped them all down, drained old oil out of them and rebuilt them. Safer than risking having a fully pumped or seized lifter that won't bleed down because that could cause valve to piston contact. Completely emptying the lifters would normally result in lifter tap until they've pumped up again with oil but I plan on running the oil pump to check pressure and flow of oil up the pushrods before I run the engine anyway, so that should help prime the hydraulic lifters and stop them bottoming out when it's first run. Hopefully I don't have the opposite problem of lifters not pumping up, I know how to test them to see if that's the case but it would have added a lot of time because I'd have wanted to bleed them down again afterwards anyway. For what they cost I might have bought new lifters but Rock Auto only had 4 in stock and the ones I removed looked like new anyway and all very smooth in their respective holes. It is extremely unlikely a lifter will fail to pump up (as said they look like new and were probably fitted last time it was rebuilt which probably wasn't long ago, although they made a bit of a hash of rebuilding it). I would have checked they pumped up anyway if the lifters couldn't be removed with the heads on (as I originally thought) but it turns out I can remove the lifters without removing the heads, would still be a pita though because the distributor and intake manifold have to come off the access them.

Today I cleaned up the timing marks on the harmonic balancer, refitted the harmonic balancer (and front pulley at the end of the day), used a magnetic dial gauge to find true TDC and make sure the timing pointer/marks were accurate, cleaned up the decks and underside of the heads again, fitted new dowels to locate the head gaskets in the decks, fitted both cylinders heads, fitted all the pushrods and rocker arms. All torqued up properly and using sealant on the outer head bolts (because they go straight through into the water jacket).

Heads back on refitting pushrods rocker arms 20240318_175357.jpg
 
Last edited:
Done a bit more on the engine today.

Fitted the oil pump

20240321_172524.jpg


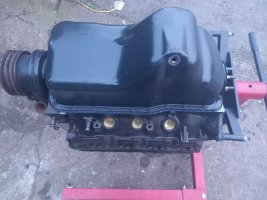
Fitted the sump

20240321_182019.jpg

In hindsight I wished I hadn't already fitted the harmonic balancer and front pulley before fitting the sump because having them fitted made it more difficult to see if the sump gasket was seated properly in it's channel over the front main bearing. I had the sump on/off a few times before I was satisfied enough that it was properly seated before tightening all the sump bolts.

I fitted the sump before fitting the inlet manifold because I intend on filling it with oil and priming the oil system by using a socket to turn the oil pump driveshaft (driven from the bottom of the distributor but driveshaft accessible before the distributor is fitted and inlet has to be fitted before the distributor can be fitted) and because I want to confirm that all the hydraulic lifters are bleeding up (lifters visible before ftting the inlet manifold). I also want to confirm firing order, which will be easier when the lifters are bled. These engines used a few different firing orders, dictated by the cam. I should really have marked plug leads and distributor position before dismantling but that's all good in hindsight. There is a fiirng order printed on the old marine exhaust manifold but they have been known to be wrong so might not even have been correct from the factory. I don't know for sure if this engine is the original one.. Although I expect it is the original engine I should do the checks I've mentioned because I want it to start immediately when I come to test it, don't want to be turning over a newly rebuilt engine without it starting.

I have some concerns about the inlet manifold, or more specifically the thermostat housing that is attached. Both are made of cast iron, the inlet manifold is a 1974 design but the design was retained for marine applications as cast iron will withstand salt water better than some materials like aluminium. The thermostat looks rusty but the botls attaching the thermostat housing to the inlet manifold itself are rusted in. I want the engine to get up to correct temperature (for marine application which is still relatively cool by car standards) because if it runs too cool it will affect proper running in, and obviously I don't want it to overheat either. The thermostat is probably OK just looking rusty but I would prefer to test it, just don't want to ruin a hard to find manifold by snapping off rusted in bolts trying to remove them.
 
Last edited:
No pics yet but today I refitted the mechanical fuel pump, filled it with oil and ran the oil pump.

All 16 lifters pumped up but at first only 14 passed oil up through the pushrods to the rockers :-(

I removed the 2 rockers that were getting no oil, removed their pushrods and removed their lifters. Swapped the positions of the lifters and turned their pushrods upside down, now the 2 offending mechanical systems do pass oil to the rockers but I want to do more testing before refitting the inlet manifold and may end up buying at least a couple of lifters and a couple of pushrods, or at least strip the lifters down again.

Back to more usual work again tomorrow though, another Elgrand coming in for LPG conversion.
 
Since my last post I ordered some new lifters and pushrods, ordered them from Rock Auto in the US and they arrived 3 days later! Only ordered 8 but I only really needed 2.

Nevertheless I fitted all the 8 that I bought, which covered the 2 I wanted to replace and another 6. Replacing the other 6 besides the 2 I needed/wanted to change was just to allow a bit more comparison between 8 original ones and 8 new ones. Turns out there seems no difference between any of them now.

Pleased to say oil comes up all 8 pushrods and oils the rockers very nicely.

Today I left the engine set at 10deg BTDC on cyl 1's compression stroke, so when I come to fit the distributor it will be in the correct position for firing #1 cylinder.
 
You'll probably laugh... It was a bit of an oversight ordering 8 lifters and 8 pushrods... Daft me thinking the engine only had 8 when it obviously has 16 :laughing:. I would've ordered 16 and changed them all, because at £1.50 for a pushrod and only a £few quid for a lifter why not? But it doesn't matter, I'd have been happy just replacing the 2 I was dubious about. I'm sure I wouldn't have got it wrong if it wasn't for how they are sold.. pushrods in sets of 8 and lifters in sets of 4, not only that but a few weeks ago they only had 4 of the correct lifters in stock. Somehow got it in my head just to buy 8 instead of 16 of these bits but no worries the 8 I won't be replacing won't be good.

I also forgot to say that I did have concerns about oil pressure. I've been turning the oil pump using a 1/4" socket on a long extension anti-clockwise using an electric drill.... Which confirmed that the oil pump was working and saw oil come up the pushrods etc, but I still had concerns about oil pressure - The engine oil pressure output has a T piece which connects to both an oil pressure switch (every engine has one to control the oil pressure light on the dash) and an oil pressure sender (to run an oil pressure gauge on the dash, most modern cars don't have one of these). The oil pressure sender was reading 240Ohms with no oil pressure (when I wasn't turning the pump) and the resistance was supposed to drop to around 120Ohms with 4 bar oil pressure... So I was worried when I found that when I first turned the oil pump resistance did go down but then it came back up to 240Ohms again (meaning no oil pressure when I was turning the oil pump, arghh!). Also the oil pressure switch was obviously broken because it's supposed to make electrical contact with no oil pressure but disconnect contact with oil pressure and it was open circuit all the time. I got another correct spec 240Ohm oil pressure sender and another oil pressure switch from Ebay, and during testing today I confirmed that resistance of the new sender does go down to 120Ohms whenever I'm turning the oil pump and the new oil pressure switch works properly - Wahey! :grinning: Else I'd need to check all the bearings again lol.

The next step is cleaning up the inlet (and coolant passages) side of the heads, then refit the inlet manifold, then the distrbutor (or I might leave fittig the dizzy until I've lifted the engine into the boat, as would't want the chains from the engine crane to damage it). Before fitting the dizzy I'll need to decide on an orientation because the plug leads to some cylinders were a bit of a tight fit having to run around the front of the engine under the marine exhaust manifolds, wouldn't want to fit it in an orientation that meant some plug leads couldn't reach.

Still some other concerns, such as the carb. I think it's a 2 barrel Holley, it has automatic electric choke. I want mixture to be correct, especially on the newly rebuilt engine, definitely don't want the electric choke sticking on and petrol washing the oil from cylinder walls on the new engine. I could rebuild the carb but then mixture settings would need resetting and it seemed to work OK before, so I'm in 2 minds about that. I may just remove the coolant temp sensors to check they're still giving proper response. Also still thinking about the looking at the thermostat, marine engines do run cooler than car engines but I don't want too cool or obviously not too hot.

I would've edited my above post to add all this extra stuff but a few people who seem interested have probably already marked it as read and would't see this if I just edited.
 
Last edited:
Confirmed firing order is 13726548.

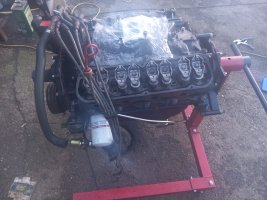
Fitted the inlet manifold and distributor today. Obviously I'll be removing the dizzy cap before lifting the engine back into the boat.

20240401_191806.jpg

The new 240Ohm oil pressure sender and oil pressure switch I fitted the other day.

20240401_191821.jpg

Before lifting the engine back in I've got to refit the backplate, flywheel, marine drive flange, marine bellhousing, starter motor and engine mounts, all except the mounts I'll have to do when the engine is suspended from the engine crane. Ahh yes, and before I do that I'll be temporarily fitting the drive leg and testing it's hydraulics.

Another few things I'll probably do before lifting the engine back into the boat are spin the engine on the starter motor to make sure I've properly engaged the dizzy with the oil pump drive, and maybe temporarily fit the ignition coil and dizzy cap to check ignition timing with the timing light. Might even run a compression test.
 
Back
Top