• Welcome to the ElgrandOC forum.

    You will find that the majority of the forum is locked, but do not worry. You can unlock more content by registering to the forum completely free. Sign up is automatic, does not require email confirmation and is instant. Feel free to browse through the sections to see what topics have been covered before you register.
    You can register for an account by CLICKING HERE

    Once you have registered, you will unlock more of the forum content. You will not unlock all of the content until you have reached 10 posts. This is to give you an opportunity to chat to existing members and help to integrate you into the forum community.
    We are a friendly and helpful community and there is a wealth of infomation contained within the forum. Please feel free to register, introduce yourself and get to know your fellow members.

    Feel free to look at the Frequently Asked Questions section, the Meets/Events section and the Competition Section without having to register.
    We look forward to getting to know you and help you with any questions or problemd you have with your Elgrand.

What have you done to your Elgrand today?

Today I thought I would have a look at my old light bar to see just how brittle the clear plastic is so I gave it a gentle twist and bend and several more cracks appeared, one across the entire height, so the answer is very brittle. Maybe the clear ones become more brittle than the red ones. So then I set the heat gun on it to soften the goo that keeps them together and despite being very careful it split into 5 separate pieces, I've taken red ones apart before without a problem. But I do now have a nice back plate to experiment with.
 
Today I thought I would have a look at my old light bar to see just how brittle the clear plastic is so I gave it a gentle twist and bend and several more cracks appeared, one across the entire height, so the answer is very brittle. Maybe the clear ones become more brittle than the red ones. So then I set the heat gun on it to soften the goo that keeps them together and despite being very careful it split into 5 separate pieces, I've taken red ones apart before without a problem. But I do now have a nice back plate to experiment with.
I’ve learned to never put heat directly on the lense even the overhung part when looking from the sides or the back, always keep the heat on the rear black stuff, especially with the clear lenses.
By far the best method of splitting I’ve found is to build the heat up slowly keeping the heat gun moving constantly and allowing a little time after direct heat before trying to part the lense from the back , it’s definitely not for the faint hearted .
 
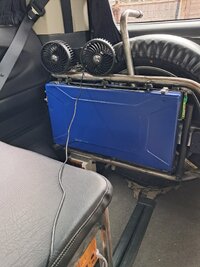
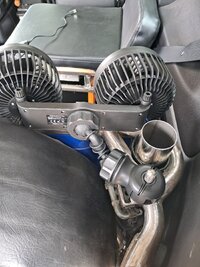
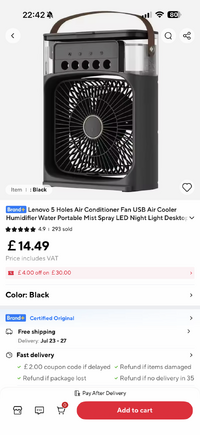
After surviving the "trial by fire" that was the Modified Nationals this year, if you were there you know what I mean - it was Bl++dy roasting, I decided to buy bigger fans to replace the rechargeable hand held ones we had that wouldn't run all night, especially on the high setting. I looked for the ones like Colin @Magnu had but came across this model in my search that fits on the headrest, didn't like the position so welded a rod into the spare wheel carrier and fitted them there, just needs a remote control now as I can't reach the switch when in bed!
20260717_155508.jpg20260717_155605.jpg
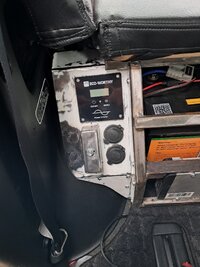
I also sorted the "control panel" for the battery box, square shiny thing with bolt in it is a cover for the solar plugs cos I know they would have been snapped off if not protected.20260717_155827.jpg
 
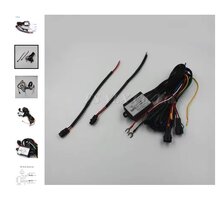
I fitted some LED fog lights a while back and only now just getting around to wiring in the DRLs.
I used this type of controller.
It appears to work OK but despite saying it doesn't require the ACC+ to be connected, it obviously does.

Anywhere in the engine bay that is easy to pick a switched 12v feed off of?
I have a fuse tap if there is anywhere suitable.

I haven't connected the indicator feeds either ATM.
 

Attachments

  • DRL_controller.jpg
    DRL_controller.jpg
    44.4 KB · Views: 8
Last edited:
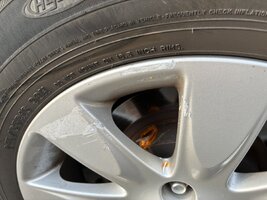
Evening all ! Young lad towing a truck axle trailer has scuffed anyone Of my alloys and the rear bumper quarter…. Light damage only, any ideas on a ball park figure on what it will cost to put right ? IMG_2033.jpegIMG_2023.jpeg
 
Well what have done mmm?re booted the transmission 4 times then realised I should not use my foot ,it hurts to do that 😉.
So all oil changed filter and cleaned all the system.
Al Cracks in dasbord finished, Al under seal done, took wheels of to be refurbished put 3 new shelves in .
Gears not so jerky but no problems computer will now learn to do as it told .

Not like the wife😲 ,asked for a cup of tea ,I did get one 2 hours later when I got back from the pub .
So had a reasonably hard weekend now relaxing in a nice warm bed in hospital black eye broken chin she didn't like it .

But we do love them ❤️
 
Well what have done mmm?re booted the transmission 4 times then realised I should not use my foot ,it hurts to do that 😉.
So all oil changed filter and cleaned all the system.
Al Cracks in dasbord finished, Al under seal done, took wheels of to be refurbished put 3 new shelves in .
Gears not so jerky but no problems computer will now learn to do as it told .

Not like the wife😲 ,asked for a cup of tea ,I did get one 2 hours later when I got back from the pub .
So had a reasonably hard weekend now relaxing in a nice warm bed in hospital black eye broken chin she didn't like it .

But we do love them ❤️
 
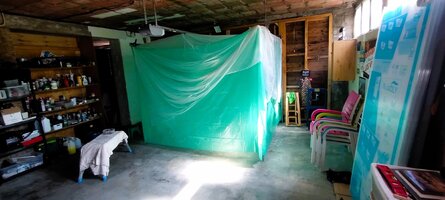
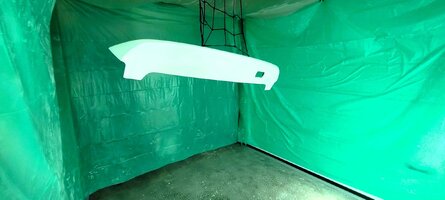
Today I turned my garage door frame into a temporary spray booth using some cheap polythene decorators sheets.

I decided in the end to respray the entire rear spoiler using the Halfords QX1 rather than trying to match it in to the existing paint. I'd previously given it a few coats of white primer without the booth and then flatted it with 1200 wet and dry but wanted to keep the dust and flies off of the metallic coat. I used the whole of the two cans I had of QX1, so several coats. Next job is to flat the QX1 then I have a nice can of Hycote bodyshop clear lacquer to finish it off.

IMG_20260718_170934888.jpg

IMG_20260718_170944997.jpg
 
Today I turned my garage door frame into a temporary spray booth using some cheap polythene decorators sheets.

I decided in the end to respray the entire rear spoiler using the Halfords QX1 rather than trying to match it in to the existing paint. I'd previously given it a few coats of white primer without the booth and then flatted it with 1200 wet and dry but wanted to keep the dust and flies off of the metallic coat. I used the whole of the two cans I had of QX1, so several coats. Next job is to flat the QX1 then I have a nice can of Hycote bodyshop clear lacquer to finish it off.

View attachment 121582

View attachment 121583
That so reminds me of my shed , when it was empty lol .
Have just bought a tent style booth ( it’s really a tent with floor and a fly net) to tackle the skirts ( if the wife stops getting bloody infections due to hospital treatments that is — story for another time)
Good luck with it @LeStempy and don’t forget it’s plastic so won’t match perfect in all lights anyway, it will also age quick in this lovely sunshine
 
Thanks, it won't be like a pro job but it will look very much better than it did with all the gouges and scratches. Just like to do the best job I can with the equipment I have.
 
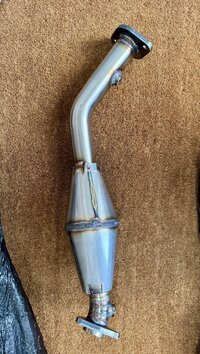
MOT passed today with 0 advisories !! 🍻 A big thank you goes to @Elementian for making me a set of his front sport cats that made this MOT possible.

If you have a 2.5 take my advice and get some sports cats at the front to get though an MOT. My newish rear cats were not up to the job despite sailing though a "peace of mind" test back in November. No amount of 'warming them up', Cataclean, injector cleaner or V power could get the emissions low enough for long enough to pass the test this year.
 
Back
Top