-
Welcome to the ElgrandOC forum. You will find that the majority of the forum is locked, but do not worry. You can unlock more content by registering to the forum completely free. Sign up is automatic, does not require email confirmation and is instant. Feel free to browse through the sections to see what topics have been covered before you register. You can register for an account by CLICKING HERE Once you have registered, you will unlock more of the forum content. You will not unlock all of the content until you have reached 10 posts. This is to give you an opportunity to chat to existing members and help to integrate you into the forum community. We are a friendly and helpful community and there is a wealth of infomation contained within the forum. Please feel free to register, introduce yourself and get to know your fellow members. Feel free to look at the Frequently Asked Questions section, the Meets/Events section and the Competition Section without having to register. We look forward to getting to know you and help you with any questions or problemd you have with your Elgrand.
You are using an out of date browser. It may not display this or other websites correctly.
You should upgrade or use an alternative browser.
You should upgrade or use an alternative browser.
Rear kitchen unit, removable
- Thread starter sg66
- Start date
Router fitted, free hand so recess bit wonky on couple of edges 
The plate was a small one for palm router, I re drilled and it's now on a big router, I don't need a fence or guide, I will screw one to the top which will get replaced once it's had six million holes put in it.
The plate was a small one for palm router, I re drilled and it's now on a big router, I don't need a fence or guide, I will screw one to the top which will get replaced once it's had six million holes put in it.
Attachments


- Messages
- 298
- Reaction score
- 990
- Points
- 153
- Location
- haworth
- First Name
- DAVID
- Elgrand
- E51
- Region
- Yorkshire
I spend the money on fuel lol.the portable fridge sits behind the drivers seat so accessible by passengers for drinks etc whilst on the move ..sits I front footwell when seating down for sleeping...whole lot lifted out in minutes for storage in garage use in awning
Attachments


- Messages
- 298
- Reaction score
- 990
- Points
- 153
- Location
- haworth
- First Name
- DAVID
- Elgrand
- E51
- Region
- Yorkshire
Anyone got a rear drive away awning for saleI spend the money on fuel lol.the portable fridge sits behind the drivers seat so accessible by passengers for drinks etc whilst on the move ..sits I front footwell when seating down for sleeping...whole lot lifted out in minutes for storage in garage use in awning
I'm sure there is a wanted section 
I think I'm going to have to relocate the fridge to the bottom of the unit, it's fairly hefty and that's before it's loaded much head scratching will follow.
Think I'm going to try a base that fixes in then the unit will slide onto it....
Anyone got a picture of the profile of the rear seats slider channels
Have some samples of edging on its way, need to buy some polystyrene over the weekend and make up a couple of trail doors to see which glue is best, I would prefer the pu stuff if it doesn't expand too much when spread thin, apparently you can glue polystyrene with wood glue, I'm not convinced
I think I'm going to have to relocate the fridge to the bottom of the unit, it's fairly hefty and that's before it's loaded
much head scratching will follow.Think I'm going to try a base that fixes in then the unit will slide onto it....
Anyone got a picture of the profile of the rear seats slider channels
Have some samples of edging on its way, need to buy some polystyrene over the weekend and make up a couple of trail doors to see which glue is best, I would prefer the pu stuff if it doesn't expand too much when spread thin, apparently you can glue polystyrene with wood glue, I'm not convinced
So acquired enough stuff to start playing.
I've made one sample door, in the most complicated way possible
I'm not sure I got the pu glue thin enough but won't be able to tell till tomorrow.
Made a square frame the size of one of the doors, cut and marked all the bits glued every face and joint, stapled the frame, it's amazing how much they hold when glued, clamped it all together and retired for the night.
The panel I've used is just a random off cut so won't look much like a door it's just so I can cut it back up and see how even it is, also to see how hinges go as it's borderline for the thickness, in theory I should have 4mm spare
You can see how much the pu expands in the last pic, there was hardly anything on it, it's strong and great for tiny gap filling but it's capable of shoving things apart over a large area.
Attachments


Send a pic to Colin Price when it's all finishedThis is just the bench to make the kitchen

It might not be fit to take a picture ofSend a pic to Colin Price when it's all finished
I'm making this up as I go along......I'm attempting to get a lower weight than lightweight ply but with strength where needed.
This is all just rough at mo, I will make proper jigs and patterns for doors the side and the back so in theory ( I like that word, it has so many escape routes
),in theory it's fairly easy to replicate the basic unit.I'm planning on getting some 3x2 flags for future clamping...........
Well prototype door came out fine, somehow managed to loose one of the locating pegs for hinge jig FFS, easy enough to locate it with remaining peg which can't fall out by design, pity the other one hadn't been the same.
Had to shorten the point on the cutter as it was just marking the outer panel, half overlap on door is bang on where it's supposed to be, plenty of adjustment on hinges if required.
Now to take it apart and cut it up to check if polystyrene core bonded ok, the door is solid so I'm guessing it's fine, fingers crossed
The equivalent weight in 15mm lightweight ply would be 2.7kg, I'm in at just over 1.2kg , replicate that over all the doors and the sides etc and it should add up to a big weight difference, which incase your wondering is why I'm doing what I'm doing, that or I'm not right in the head
Had to shorten the point on the cutter as it was just marking the outer panel, half overlap on door is bang on where it's supposed to be, plenty of adjustment on hinges if required.
Now to take it apart and cut it up to check if polystyrene core bonded ok, the door is solid so I'm guessing it's fine, fingers crossed
The equivalent weight in 15mm lightweight ply would be 2.7kg, I'm in at just over 1.2kg
, replicate that over all the doors and the sides etc and it should add up to a big weight difference, which incase your wondering is why I'm doing what I'm doing, that or I'm not right in the head Attachments


For anyone still reading
I started making the more accurate final jigs for the sides and back, as they are laminated and glued they have to be flat cause once they are assembled and clamped that's the shape they will stay
It's a pity there wasn't room to put a curved unit in I like the idea of making curved doors.
No pics today, life demands I must spend time with the wife, which I might add I like doing but it's most inconvenient
First and biggest lightweight section out of the jig/clamp
Going to be carbon for the back and the sides to blend in with the leather and wood colour everywhere else, this is the back section, its pretty light. Much lighter than lightweight ply.
Going to be carbon for the back and the sides to blend in with the leather and wood colour everywhere else, this is the back section, its pretty light. Much lighter than lightweight ply.
Attachments


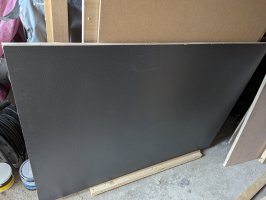
I've started on the worktop, I was just going to use 12mm ply with a frame as ply on its own still has a bit of flex, then I thought that's a bit straightforward and heavy so I've gone to 5.what ever mm ply was available at Wickes.
I did have an offcut but by the time I cut it square and trimmed it I was out by 3mm, I was contemplating continuing with it but my OCD wouldn't allow it
So going with 5mm 20mm polystyrene and 3mm, with frame that's been glued and pinned, the smallest nails I had for the gun have just come through the timber, nothing a flappy disk won't cure.
I've gone with solid frame around sink, means I can screw direct onto top rather than the clamps that came with it, that or just bond it in which I may do anyway.
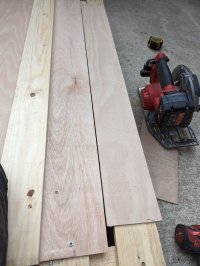
I made a ply guide rail for my circular saw and the pallet is a great little work station.
that's a bit straightforward and heavy so I've gone to 5.what ever mm ply was available at Wickes.I did have an offcut but by the time I cut it square and trimmed it I was out by 3mm, I was contemplating continuing with it but my OCD wouldn't allow it
So going with 5mm 20mm polystyrene and 3mm, with frame that's been glued and pinned, the smallest nails I had for the gun have just come through the timber, nothing a flappy disk won't cure.
I've gone with solid frame around sink, means I can screw direct onto top rather than the clamps that came with it, that or just bond it in which I may do anyway.
I made a ply guide rail for my circular saw and the pallet is a great little work station.
Attachments


Last edited:
So tonight I had the bright idea of bonding in the 20mm foam and the underside of the top with 3mm ply decided to go a bit thicker with overall thickness for worktop.
Turned out to be not such a good idea, in this heat the foaming glue was true to its word, it was almost instant and caught me rather unprepared.
So no pics due to panicking it's currently living under aprx 80kg and a clamp wedging it down from the garage roof..
Lesson learnt, wait till heatwave is over and have clamping stuff ready......
Turned out to be not such a good idea, in this heat the foaming glue was true to its word, it was almost instant and caught me rather unprepared.
So no pics due to panicking
it's currently living under aprx 80kg and a clamp wedging it down from the garage roof..Lesson learnt, wait till heatwave is over and have clamping stuff ready......