• Welcome to the ElgrandOC forum.

    You will find that the majority of the forum is locked, but do not worry. You can unlock more content by registering to the forum completely free. Sign up is automatic, does not require email confirmation and is instant. Feel free to browse through the sections to see what topics have been covered before you register.
    You can register for an account by CLICKING HERE

    Once you have registered, you will unlock more of the forum content. You will not unlock all of the content until you have reached 10 posts. This is to give you an opportunity to chat to existing members and help to integrate you into the forum community.
    We are a friendly and helpful community and there is a wealth of infomation contained within the forum. Please feel free to register, introduce yourself and get to know your fellow members.

    Feel free to look at the Frequently Asked Questions section, the Meets/Events section and the Competition Section without having to register.
    We look forward to getting to know you and help you with any questions or problemd you have with your Elgrand.

What have you done to your Elgrand today?

Not on any of my own Elgrands but today on a customer @Ruppert 's 2.5 Elgrand I changed the (rear) cam sensors, cam cover gaskets, PCV valve and serviced the LPG system.

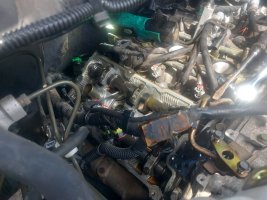
It is much easier to access the rear cam sensors on the 2.5 when the cam covers have been removed.

Note how clean the cylinder head is under the cam cover, this will be due in most part to running on LPG and in part to timely oil changes.

In the pics I have the petrol line disconnected and offside VVT solenoid removed to make it easier to remove and refit the cam cover, clean up the mating surfaces and add RTV to the 'corners' where the cam cover gasket goes from being flat to going over the domed cam drive. The offside cam sensor is removed from the cylinder head but still attached to the wiring, it is easier to remove the sensor from the head then disconnect the wiring than the other way around.

20250506_142213.jpg

20250506_142023.jpg
 
Last edited:
Not really sure where to post this, it is what I have done to the bus but it may want to be in "mods", anyhow, I have converted my back seats to become quickly detachable, well quickish.
I drilled holes in the side plastic covers to get to the pivot bolts at the front and rear of the seats, the holes are covered with rubber blanking plugs when the seats are fitted, the plugs are removed and the two bolts are removed and the seat lifted out, total time to remove one seat, 2 minutes, this leaves the top slider and seat belt mounting still attached. I used a dremel with a tile cutter bit (I find these great for plastic cutting) to start the hole and conical drill bit to get to the size i needed, 26mm for the blanking plugs I used, this allows the long socket to fit through the plastic cover and undo the bolts. I removed the rear plastic trim but did the cutting on the front one while attached because I didn't want to remove the seat handle. Pictures as follows
Number 1 -Cover with bolt underneath
Number 2 -Cover removed with hole drilled in cover
Number 3 - Cover with blanking plug fitted
Number 4 - Blanking plug and conical drill
Number 5 - Seat fitted showing rear cover and blanking plug
Number 6 - What's left after seat removed

I hope this makes sense, the inner side panel is not on as I have another job to do.
View attachment 114172View attachment 114173View attachment 114174

View attachment 114175View attachment 114176View attachment 114177
I think this is a good idea for anyone who needs their seats out frequently. Taking the seats out the normal way is also easy but this is (arguably) a neater finish and requires two less bolts to undo.
 
Spent the last couple of days with my OH giving the old chap a proper clean. Clay bar, cutting, Polish and wax fully machine buffed.
Got the Headlights pretty clear, but giving them another go tomorrow.
Next up, rubber and plastics restored and all trim clips replaced.
The highlight of my day was the delivery of my table, where I christened it with a chippy dinner 🤣
Loving the table. Can you provide some details please?
 
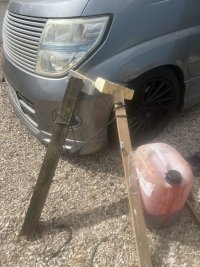
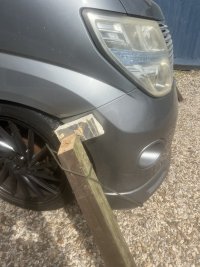
Time to refix the front bumper with the help of grip mastic some bits of wood and bungees ..mainly because the bumper clip points have failed and I’ve rolled the arches to make the 19” turbines on 10mm spacers for without any rubbing … needs must View attachment 114183View attachment 114184
And after 24 hours of curing it has done its job … looking fabulous … now I might wash it as it’s covered in pollen …
 
Yesterday put rear cats back on for MOT.
Today got her back, yip pass, all good.
It did fail at first with a major defect, yes wait for it

Anit roll bar linkage ball dust cover no longer prevents the ingress of dirt offside front.

So in short the rubber cover had perished, I did look a week or so and it seemed fine then.
But just by luck I had a spare in the rear pocket, so to save hassle, just told them, one in the boot just chuck it on, they agreed, so picked it up new MOT no advisories, great.
The bill to fit a drop link, which was a major defect ( come on should be at best an advisory, surly)
£70 + MOT + vat
£134
I'm feeling really sorry for people that don't do their own and rely on garages to do the work.
I must have saved millions through the years.
But where did it go
Fuel
Rear drop links being replaced tomorrow. My local garage only charged £50 for doing the front. In hoping for a similar figure for the rear.
 
Not really sure where to post this, it is what I have done to the bus but it may want to be in "mods", anyhow, I have converted my back seats to become quickly detachable, well quickish.
I drilled holes in the side plastic covers to get to the pivot bolts at the front and rear of the seats, the holes are covered with rubber blanking plugs when the seats are fitted, the plugs are removed and the two bolts are removed and the seat lifted out, total time to remove one seat, 2 minutes, this leaves the top slider and seat belt mounting still attached. I used a dremel with a tile cutter bit (I find these great for plastic cutting) to start the hole and conical drill bit to get to the size i needed, 26mm for the blanking plugs I used, this allows the long socket to fit through the plastic cover and undo the bolts. I removed the rear plastic trim but did the cutting on the front one while attached because I didn't want to remove the seat handle. Pictures as follows
Number 1 -Cover with bolt underneath
Number 2 -Cover removed with hole drilled in cover
Number 3 - Cover with blanking plug fitted
Number 4 - Blanking plug and conical drill
Number 5 - Seat fitted showing rear cover and blanking plug
Number 6 - What's left after seat removed

I hope this makes sense, the inner side panel is not on as I have another job to do.
View attachment 114172View attachment 114173View attachment 114174

View attachment 114175View attachment 114176View attachment 114177
Top work @BrianH I like this a lot, deserves its own place somewhere. Step drill ordered!
 
Ì
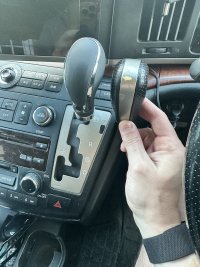
bought my first Elgrand today e52 rider s autech. How to connect AUX in to play music via phone guys :D ?
If you want to use Bluetooth for calls and streaming, this guide helped me.
I think the later E51 and E52 are similar and if not there are guides for the E52.

 
Back to blacked all of the trim and finally got the electrics sorted via EcoFlow and alternator charger as chatted about before - mot and service soon so will hold off any further work after I have seen the bill lol x
 
Buffed the headlight I picked up yesterday from Tojo motors in Beverly, met Steve @stevemen, great bloke, very knowledgeable and a good price for the headlight to replace mine damaged by the hare, I've now got him on speed dial incase I encounter any more mad hares.
 
This week I changed the engine oil and filter.
(Made a new tool for taking off oil filter through the inspection flap - no more need to take off under trays.
Air filter.
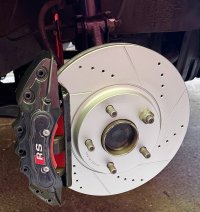
Front pads and drilled and grooved discs, new anti squeal shims/clips.
Calliper dust covers.
Rear shoes….advised by MOT man Dec.
4 wheels refurbed - skimmed outer lips on lathe, steam cleaned and inner rims painted.
Two new tyres on the front - destroyed due to fouling again.
The wheels are still off the Van as I ran out of steam, so hot this week, no rush though.

Brought the Audi into play, I hardly use it….first day I popped out for some ThreadLock and silicone grease.

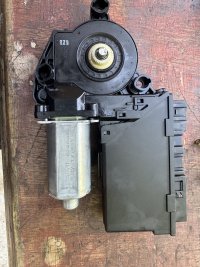
I rolled the window down and there was a large bang and the window fell to the bottom of the door.

FFS the window was stuck in its runner and seal due to lack of use and this snapped the cable in the motor spool.

Epic adventure - the time I need it, it lets me down vorsprungdorktechnik my arse.

Did other stuff too - but I’ve forgotten.

IMG_7780.jpeg
IMG_7786.jpeg
IMG_7787.jpeg
IMG_7800.jpeg
IMG_7818.jpeg
 
Last edited:
19's, they do look kind of small tho

Walton
How do you find them? The roads are so bad that even on 17s with a 60 profile I worry.

The Bridgestones I had fitted recently do help with the ride a lot though compared to the original Yokos.
 
Back
Top