-
Welcome to the ElgrandOC forum. You will find that the majority of the forum is locked, but do not worry. You can unlock more content by registering to the forum completely free. Sign up is automatic, does not require email confirmation and is instant. Feel free to browse through the sections to see what topics have been covered before you register. You can register for an account by CLICKING HERE Once you have registered, you will unlock more of the forum content. You will not unlock all of the content until you have reached 10 posts. This is to give you an opportunity to chat to existing members and help to integrate you into the forum community. We are a friendly and helpful community and there is a wealth of infomation contained within the forum. Please feel free to register, introduce yourself and get to know your fellow members. Feel free to look at the Frequently Asked Questions section, the Meets/Events section and the Competition Section without having to register. We look forward to getting to know you and help you with any questions or problemd you have with your Elgrand.
You are using an out of date browser. It may not display this or other websites correctly.
You should upgrade or use an alternative browser.
You should upgrade or use an alternative browser.
What have you done to your Elgrand today?
- Thread starter Madfish
- Start date
- Messages
- 4,165
- Reaction score
- 12,561
- Points
- 383
- Location
- York
- First Name
- Rob
- Elgrand
- E50
- Region
- Yorkshire
They're good mate. Give a much clearer light output and don't seem to be dazzling anyone. Well no ones flashed at me yet... proper paranoid about getting busted for them though as at night they are proper blueHows your bulbs mate forgot to ask

- Messages
- 2,939
- Reaction score
- 8,879
- Points
- 383
- Location
- Hull
- First Name
- Matthew
- Elgrand
- E50
- Region
- Yorkshire
They're good mate. Give a much clearer light output and don't seem to be dazzling anyone. Well no ones flashed at me yet... proper paranoid about getting busted for them though as at night they are proper blue
 think I'd be twitching a bit too do sound good tho
- Messages
- 12,562
- Reaction score
- 36,788
- Points
- 473
- Location
- Normandie
- First Name
- André
- Elgrand
- E51
- Region
- Rest Of World
That's the bit that scares me. I would probably want to practise on a damaged one first.Agree mate I'm sure there'd be interest
@Stempy do you offer an open up the light cluster service as well
- Messages
- 4,165
- Reaction score
- 12,561
- Points
- 383
- Location
- York
- First Name
- Rob
- Elgrand
- E50
- Region
- Yorkshire
Yeah it puts me off doing any light alterations. I know others have done stuff without problems, but we know these parts aren't cheap if it goes tits upThat's the bit that scares me. I would probably want to practise on a damaged one first.
- Messages
- 9,420
- Reaction score
- 39,388
- Points
- 473
- Location
- Co. Durham
- First Name
- Andy
- Elgrand
- E51
- Region
- North East
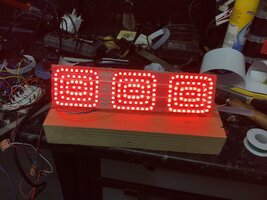
Awesome job mate. looks well cool.This afternoon I began a little project with an Arduino and some LED rings. I wrote a simple sketch to get me started with a slow repeating pattern. With some further development it may be something I could offer in a plug and play format should there be enough interest.
View attachment 50190
Once you have mastered those you could do RGB
- Messages
- 12,562
- Reaction score
- 36,788
- Points
- 473
- Location
- Normandie
- First Name
- André
- Elgrand
- E51
- Region
- Rest Of World
Yes, these are RGB in fact, just chose red for tail lights. I now have them changing colour so would be good behind a clear lens.Awesome job mate. looks well cool.
Once you have mastered those you could do RGB
- Messages
- 9,420
- Reaction score
- 39,388
- Points
- 473
- Location
- Co. Durham
- First Name
- Andy
- Elgrand
- E51
- Region
- North East
- Messages
- 90
- Reaction score
- 152
- Points
- 173
- Location
- Birmingham
- First Name
- Brian
- Elgrand
- E51
- Region
- Midlands
I agree, it does sound like a failure in the bulb as it does fire up and then switches off. To eliminate the bulb which it is approximately 98%of the time failed is put the other bulb from the good side in the failing side as I did to eliminate the easy option first to which mine wasn't, plus there is no cheaper option as both are around £40 each , they are both easy to change, its just one is more time consuming than the other. Yes they are a sealed unit and so should last the lifetime of the vehicle, yes the "shouldn't break down" (if only) but they are far from perfect and do break down as they are not as robust as once percieved as the life of the ballast diminishes over time so the light becomes dimmer, and fire up time longer. mine didn't fail it was the fact that water that had leaked in due to a cracked case. I can see the difference in the light that is cast from each bulb as it is fired up by the ballast the one I replaced is much faster than the other one and is brighter, I also replaced both bulbs which cost £160 and my own time spent fixing MystiqueIt’s the bulb had the same problem with daiseys lights .. the ballast is a sealed unit so shouldn’t break down ..
 which is always a pleasure to work on!!!! ¡! Most of the time
  .
.- Messages
- 298
- Reaction score
- 410
- Points
- 198
- Location
- Lincoln
- First Name
- Dave
- Elgrand
- E51
- Region
- Midlands
That’s interesting. Got mine to this stage. But not sure if the orange for the sequential indicators will show through a red lens, clear will obviously make the led array structure visible as per the pic. My existing internal lenses are red as mine has Rider lights fitted with the silver centre section.Mmm, might have to borrow some ideas.
Im family confident I can get the light bar apart but it’s the corner lights I’m worried about. Its at least £200 for replacement set if it goes wrong. The pic below shows all the leds on in brake mode just to test the leds but by using an Arduino it’s possible to split the segments to give say two rings for brake and two different rings for rear lights And sequential indicators. It’s a work in progress


Attachments
- Messages
- 1,501
- Reaction score
- 3,554
- Points
- 333
- Location
- County durham
- First Name
- Simon
- Elgrand
- E51
- Region
- North East
I'd be interested for sure.Awesome stempy great idea plug and play for those who want an easy install


- Messages
- 90
- Reaction score
- 152
- Points
- 173
- Location
- Birmingham
- First Name
- Brian
- Elgrand
- E51
- Region
- Midlands
MmmmmmmThat’s interesting. Got mine to this stage. But not sure if the orange for the sequential indicators will show through a red lens, clear will obviously make the led array structure visible as per the pic. My existing internal lenses are red as mine has Rider lights fitted with the silver centre section.
Im family confident I can get the light bar apart but it’s the corner lights I’m worried about. Its at least £200 for replacement set if it goes wrong. The pic below shows all the leds on in brake mode just to test the leds but by using an Arduino it’s possible to split the segments to give say two rings for brake and two different rings for rear lights And sequential indicators. It’s a work in progress
 yous are having some fantastic ideas
  always wanted more break lights.
- Messages
- 2,959
- Reaction score
- 8,423
- Points
- 373
- Location
- HAMPSHIRE
- First Name
- robert
- Elgrand
- E51
- Region
- South East
its not more brake lights i needed it was a big cushion
- Messages
- 1,501
- Reaction score
- 3,554
- Points
- 333
- Location
- County durham
- First Name
- Simon
- Elgrand
- E51
- Region
- North East
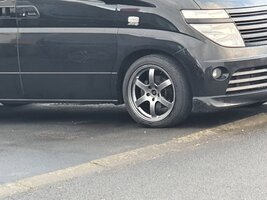
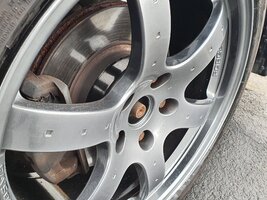
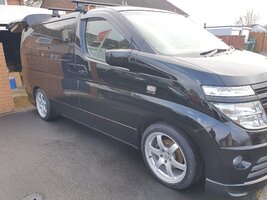
Picked the bus up from having the wheels powder coated in black chrome/shadow chrome. And I'm over the moon with them . They do look just sort of grey , compared to the original colour. but when you get them in a decent light they are brilliant. ❤
❤Attachments
- Messages
- 249
- Reaction score
- 528
- Points
- 173
- Location
- Bristol
- First Name
- Liam
- Elgrand
- E51
- Region
- South West
Got the tracking done. Still some Knock / clunking noise. Only other things can be are top mounts.
Hope new top mounts will stop the clunking as replaced ball joints, f & r bushes, drop links, d bushes, tie rod ends, steering rack...
Hope new top mounts will stop the clunking as replaced ball joints, f & r bushes, drop links, d bushes, tie rod ends, steering rack...
- Messages
- 1,501
- Reaction score
- 3,554
- Points
- 333
- Location
- County durham
- First Name
- Simon
- Elgrand
- E51
- Region
- North East
Anti roll bar bushes? .Got the tracking done. Still some Knock / clunking noise. Only other things can be are top mounts.
Hope new top mounts will stop the clunking as replaced ball joints, f & r bushes, drop links, d bushes, tie rod ends, steering rack...
- Messages
- 576
- Reaction score
- 1,449
- Points
- 333
- Location
- Nottingham
- First Name
- Steve
- Elgrand
- Ex Owner
- Region
- Midlands
I’ve had an annoying knocking for a long time as well. You’ve practically changed everything!Got the tracking done. Still some Knock / clunking noise. Only other things can be are top mounts.
Hope new top mounts will stop the clunking as replaced ball joints, f & r bushes, drop links, d bushes, tie rod ends, steering rack...
Is it a loose part type knock or a tight part type knock?
Not being funny there is a difference.
Loose is a more hollow with vibration sound.
Tight is a through the chassis thud.
Not being funny there is a difference.
Loose is a more hollow with vibration sound.
Tight is a through the chassis thud.